Profiles
Under Profiles you manage training profiles: topographic profiles (route), heart-rate profiles, and power profiles. The page is opened via the Profiles entry in the navigation bar of the main window, right below Training Overview.
Layout
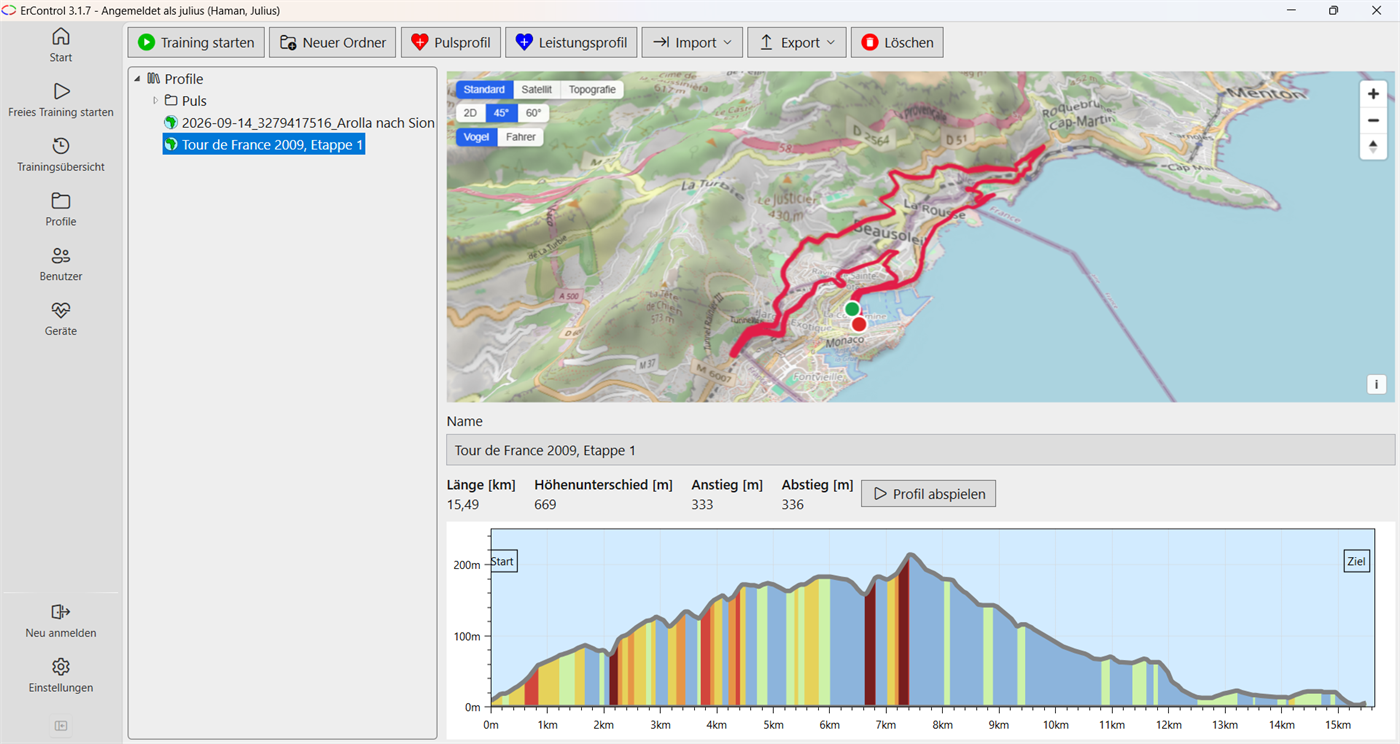
Profiles: tree structure on the left, map, key figures and elevation profile of a topographic profile on the right.
On the left, a tree of folders and profiles. The top-level entry Profiles represents the top level without a folder.
On the right, for the selected profile, a name field plus metrics matching the profile type:
Topographic: length, elevation difference, ascent, descent.
Heart-rate controlled: duration (as m:ss, h:mm:ss from one hour on) plus target heart rate (min./max./average) in percent and beats.
Power controlled: duration plus target power (min./max./average) in watts or in % FTP, see Power in watts or % FTP.
For topographic profiles, a 3D map of the route above the chart, see Map and route preview (topographic profiles).
A chart shows the profile’s curve (route profile, or heart-rate/power curve). For topographic profiles, the elevation profile is additionally colored by gradient (fixed color bands like Strava/Garmin/komoot, see Gradient colors in the elevation profile). The elevation axis adapts to the actual elevation range of the route (with round axis limits and a minimum span of 50 m), so that flat routes remain readable and profiles at high altitude do not start at 0 m.
For heart-rate profiles, the five heart rate zones are shown as lightly tinted bands (50/60/70/80/90/100 % of the maximum heart rate) behind the target curve; the curve is therefore drawn without an area underneath, and the heart rate axis always extends from 0 to at least 100 % of the maximum heart rate so that all zones are fully visible (it grows if a point lies above that). For power profiles, the power axis likewise always extends from 0 to at least 200 W.
For heart-rate and power profiles, additionally a points editor (a table with time and target-value columns) used to edit the curve manually. Topographic profiles have no points editor; they are created exclusively via GPX import (see Import and export).
For heart-rate profiles, the segments should be at least about 5 minutes long: heart rate follows a power change only with a delay (about 1-2 minutes) and then needs a while longer to settle. With shorter heart-rate changes the target heart rate is hardly reached, because the next change follows already. This is not a control fault, it is physiology.
The following applies to the points editor:
New row: sits 5 minutes after the previous row and takes over its value (watts or % of maximum heart rate); the first row of a new profile starts with 25 W or 70 %. Only visible rows count as the previous row.
Tab in the last cell of the last row inserts a new row and jumps to its first cell.
A cell edit still in progress is applied automatically when adding, deleting and saving. After deleting, the previous row is selected.
The selected row is highlighted in the chart; a click in the chart selects the nearest point in the table.
As long as point changes are unsaved, the profile tree and the toolbar are locked - continue with Save or Cancel.
A folder or profile is selected by clicking it in the tree; new folders/profiles are always placed at that location (shown as the tooltip “Location: …”).
Profiles and folders can be moved to other folders or to the top level (Profiles) by drag and drop; the change is saved immediately. It is not possible to move into the current parent folder, into the folder itself or into one of its subfolders. With Ctrl or Shift click, several entries of a common folder can be selected and moved together.
Power in watts or % FTP
Power profiles specify the target power in either watts or % FTP; the Einheit (unit) selection (Watt / % FTP) is in the points editor. A %-FTP profile converts the values to watts while riding using the user’s FTP (see Users), so it can be used by riders of different ability. When you switch the unit, the points are converted; this requires an FTP to be stored for the user. Without an FTP, a %-FTP profile cannot be started - ErControl points out the missing value. Heart-rate profiles always specify their target values in % of maximum heart rate.
Gradient colors in the elevation profile
The elevation profile of a topographic profile (also in the profile view of the training window) is colored according to the average gradient of each route section:
Color |
Gradient |
Meaning |
|---|---|---|
below 0 % |
downhill |
|
0 % to below 3 % |
flat |
|
3 % to below 6 % |
moderate |
|
6 % to below 9 % |
steep |
|
9 % to below 12 % |
very steep |
|
12 % and above |
extremely steep |
Each colored area stands for the average gradient of a section of at least 30 m. The further you zoom out, the longer the sections become (at least about 4 pixels wide): this keeps a coherent color picture even on very long routes instead of color noise. A short steep stretch therefore disappears in the averaging in the overall view and only becomes visible when you zoom in. The shape of the elevation profile itself remains unchanged.
Operating the chart
Zooming: The mouse wheel zooms the chart in and out along the route (along the time axis for heart rate and power profiles).
Panning: Drag with the right mouse button held down to move the visible section to the left or right.
Zooming and panning only work along the route or time axis. For topographic profiles, the elevation axis automatically adapts to the visible section (with a minimum span of 40 m); when the whole route is visible, the overview scale applies again. For heart rate and power profiles, the value axis stays scaled to the entire curve.
Tooltip: A click in the chart shows the values at that point. For topographic profiles these are kilometers, elevation in m and gradient in % (e.g.
12.3 km · 456 m · +4.5 %), for heart rate and power profiles the time as m:ss, from one hour on h:mm:ss (e.g.75:30or1:15:30) and the target value with its label and unit (e.g.Power (W): 180).
Actions
Start training – starts a training session with the selected profile. Heart-rate and power profiles open the same training window as Free Training (see Starting Free Training); topographic profiles first open the start window and then the 3D training window (see Training window).
Play profile – topographic profiles only: rides the profile automatically, see Map and route preview (topographic profiles). The button switches to Stop in the meantime.
New Folder – creates a new folder at the current placement location.
Heart-rate profile / Power profile – creates a new, empty heart-rate or power profile, which you then fill with values via the points editor and apply with Save (Cancel discards unsaved changes).
Import – opens a menu, see Import and export.
Export – opens a menu, see Import and export.
Delete – permanently deletes the selected profile, or the folder along with its contents, after confirmation. If a profile has already been ridden in a training session, it (and any folder containing it) is protected from deletion.
When you create a power profile from a training session in the Training Overview, you are automatically taken to this Profiles page afterwards.
Import and export
An import always creates a new profile at the current storage location. The menu item GPX-Import reads a GPX file as a topographic profile. Workout-Import reads workout files in the formats ZWO (Zwift), MRC, ERG and FIT (Garmin) as a power or heart-rate profile: ZWO and MRC are created as a profile in % FTP, ERG as a profile in watts. FIT workouts with targets in watts, % FTP or % of maximum heart rate (the latter result in a heart-rate profile) are also accepted. Ramps are resolved into steps of 30 seconds each, repetitions are unrolled. Steps that ErControl cannot implement (for example zones or heart-rate targets in bpm) keep the previous target; a notice lists such skipped sections after the import.
The menu item Export writes a heart-rate or power profile as a FIT workout (e.g. for Garmin Connect or Garmin devices), or a topographic profile as a GPX track with elevation; the descriptions of the profile points become waypoints.
Map and route preview (topographic profiles)
For a topographic profile, the profile view shows a 3D map of the route above the elevation profile (for operating the map, see Training window → Map view). The route is built from the GPS coordinates of the imported GPX file; without GPS coordinates the map shows the message “Keine Strecke mit GPS-Koordinaten vorhanden.” (no route with GPS coordinates available).
Aiming: when you move the mouse over the elevation profile, a vertical guide line with a tooltip (kilometer, elevation in m, gradient in %) appears. A marker moves along on the map. A click pins the marker at that spot, another click releases it.
Rider view: the Fahrer (rider) button tilts the camera onto the route and follows the aimed point in the direction of travel. This lets you “ride” the route in advance. Vogel (bird’s-eye) switches back to the overview.
Play profile: the Play profile button moves the marker automatically along the whole route; in the rider view the camera follows. A run takes at most 2 minutes - longer profiles are played back correspondingly faster. Stop (or switching the profile) ends the playback.
Start window for topographic profiles
For a topographic profile, Start training first opens the Topographisches Profil starten (start topographic profile) window with the elevation profile and the question of where the training should begin:
Bei 0 km starten (start at 0 km, preselected) or
Bei folgender Startdistanz starten (start at the following start distance): the start distance is either entered in km in the field or set by clicking on the elevation profile (the guide line with tooltip works as above). A dashed red mark shows the chosen spot.
Start opens the 3D training window, Abbrechen (cancel) closes the window without starting a training. Multiple “stages” of a profile no longer exist: whoever rides a long profile in parts simply chooses, next time, the start distance where they stopped last. Each ride appears as a training of its own in the Training Overview.
The same start window also opens via Continue or Continue profile at x km in the Training Overview and the Training Detail - already pre-filled with the end position of the continued training as the start distance, which can still be changed here before starting (see Continue Profile).