Devices
The devices area is reached via Devices in the main navigation and is split into two tabs: training devices and heart rate monitors. Applies only to the currently logged-in user.
Any number of named devices can be created per tab, but exactly one is marked active (star) - that’s the device actually used when training starts. An active training device is required; an active heart rate monitor is optional.
All changes (name, connection type, ANT+ number, COM port) are applied immediately - there’s no more Save/Cancel.
Each row in the list additionally shows an icon for the connection type (ANT+, BLE, or serial).
Training devices
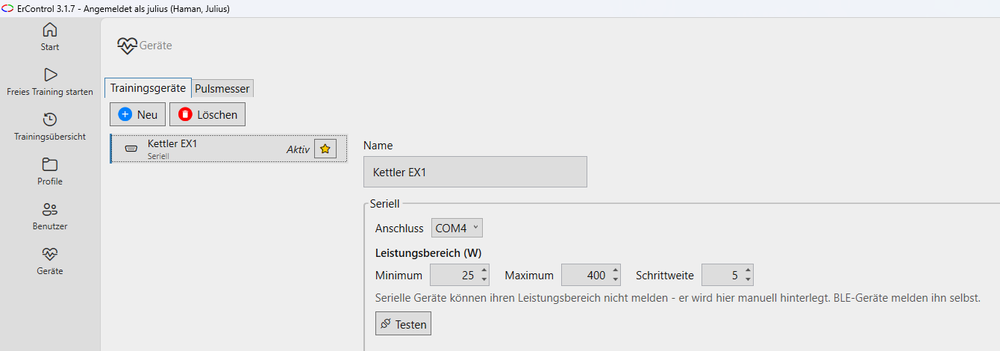
Training devices tab: list on the left, detail area with port and power range on the right.
List of created devices on the left, detail area on the right. Buttons New and Delete.
New opens the device selection (see below) - only an actual selection creates the device, using the display name of the device found (assigned automatically for serial).
Name can be changed at any time.
Connection type: serial, ANT+ FE-C, or BLE (Bluetooth, for trainers with BLE FTMS or Tacx FE-C over Bluetooth), changeable at any time. Depending on the selection, a matching section with a Test button appears:
Serial: select a COM port; Test connects over it on a trial basis. The power range is entered by hand here. When connecting, ErControl tries the baud rates 57600 and 9600 and remembers per device the rate that worked last; it is tried first on the next connection, so the wait for the wrong rate is saved.
ANT+ FE-C: fixed device number can be entered directly; Test connects on a trial basis via ANT+ against that number. Without a number, Test is disabled. Here, too, the power range is entered by hand.
BLE: device name and address are only set via the device selection under “New” and are read-only here - create a new device for a different one. Test connects against the stored address; without an address, Test is disabled. On connecting, ErControl additionally reads the power range (minimum, maximum, step size) reported by the device and uses it for power control, if the device supports it - otherwise the default values (25 / 400 / 5 watts) apply, see Power range. Before connecting, ErControl waits up to 5 seconds for the device to announce itself via Bluetooth (advertisement) and otherwise tries again. For this the device must be switched on and within range and, as a rule, should not be connected to another program. ErControl itself detects on connecting whether the device speaks the BLE FTMS standard or the Tacx service Tacx FE-C over Bluetooth - FTMS takes precedence. For you both ways are simply “BLE”; an ANT+ stick is not needed for Tacx trainers over Bluetooth. A Tacx trainer does not report a power range over this way, the default values apply (see Power range).
The “first device found” option no longer exists - every device has a fixed address or device number.
Star button per row: marks the device as active. The active device cannot be deleted.
When the first device is created, it becomes active automatically.
After updating from a previous version, no training device appears in this list yet - only when training is actually started for the first time is a device named “Migrated” automatically created from the previous settings (connection type, port or BLE address) and set active. The former setting Maximum power is carried over as the maximum of the power range; training devices that already existed received it during the update.
Power range
Every training device has a power range made up of minimum, maximum and step size in watts. ErControl uses it to limit and round every power value it sends to the ergometer: for power profiles, heart-rate control, the virtual gear shifter and power control via the Numpad keys. The power slider of the simulator in the training window follows it as well.
Where the range comes from depends on the connection type. ErControl uses the first source that supplies a value:
BLE with FTMS: the device reports the range itself and ErControl reads it on connecting. It only applies to the current session and is not saved.
Serial and ANT+ FE-C: ErControl cannot query a power range in watts from these devices. It is therefore entered by hand in the detail area under Power range (W) (default: 25 / 400 / 5 watts). Changes apply immediately. ErControl corrects implausible entries: the step size is at least 1 watt, the minimum is not negative and the maximum is not below the minimum.
Default values (25 / 400 / 5 watts) if a BLE device does not report a range - this also applies to Tacx trainers over Bluetooth without FTMS.
A missing reported range is not an error: the connection is still established and ErControl simply uses the next source. For a serial device the maximum is additionally used to discard implausible measured values above it.
Heart-rate control may reduce power all the way down to 0 watts, regardless of the minimum.
Heart rate monitors
Same layout as for training devices (list, detail area, New/Delete, star to activate).
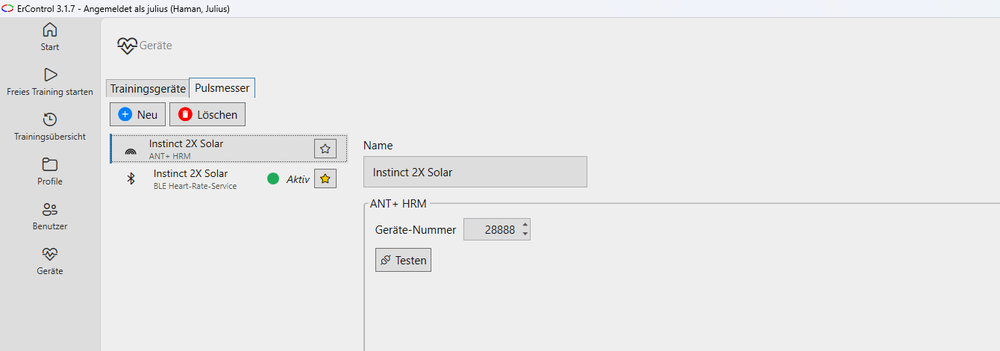
Heart rate monitors tab: an ANT+ heart rate monitor (selected, with device number) and an active Bluetooth heart rate monitor.
Connection type: ANT+ HRM or BLE Heart-Rate-Service.
ANT+ HRM: fixed device number can be entered directly. Test waits up to 30 seconds for the first heart rate reading - success shows the measured heart rate, otherwise a “no sensor found” notice. Without a number, Test is disabled.
BLE Heart-Rate-Service: device name and address are only set via the device selection under “New” and are read-only here. Test connects against the stored address and likewise waits up to 30 seconds for the first heart rate reading - a watch that’s merely reachable without an actively transmitting chest strap doesn’t count as success. Without an address, Test is disabled. Here too, ErControl waits up to 5 seconds before connecting for a message from the device; re-pairing after restarting the watch is therefore no longer necessary. For this, a watch must be transmitting the heart rate (broadcast).
The “first device found” option no longer exists for heart rate monitors, whether ANT+ or Bluetooth.
One difference from training devices: clicking an already-active heart rate monitor again deactivates it, instead of making another device active.
An active heart rate monitor is optional - without one, the heart rate measured by the ergometer itself is used, provided the ergometer supports it.
The devices overview itself does not establish a Bluetooth connection and shows no live status or pulse. Connections are only made via Test, in the “Connect devices” dialog and during training - a persistent connection of the overview would otherwise interfere with the test and the training.
Device selection
Opens via New and has the same layout for training devices and heart rate monitors:
Switch between ANT+ and BLE (for training devices, also Serial as a manual branch without scanning - creates the device directly, the COM port is then chosen in the detail area).
Only devices that are actually transmitting or advertising during the scan appear. Selecting one adds the device to the list immediately.
Devices that are already added for this role (training device or heart rate monitor) stay visible in the list but are greyed out, marked Already added and cannot be selected. Matching uses the device number for ANT+ and the address for Bluetooth. The result rows are single-line; text that is too long is shortened with “…” and shown in full as a tooltip.
BLE: for trainers that offer the Tacx service “FE-C over BLE” instead of FTMS (for example the Tacx Vortex Smart), the list shows the note Tacx FE-C after the name. The entry is created like any other BLE device.
ANT+: The search ends on its own when no further device has been found for about 10 seconds and reports “No devices found.” or “N devices found.”. ErControl lists at most four devices per search; after 90 seconds at the latest the search is aborted (the ANT+ stick may then not be responding). A heart rate strap appears as ANT+ Pulsmesser (Geräte-Nr. …) (ANT+ heart rate monitor, device no.).
Device no. and ID on the watch: For the same sensor, a Garmin watch may show a longer ID (for example 560741). ErControl shows the shorter ANT+ device number; it is the remainder when the watch ID is divided by 65536 (560741 gives 36453).
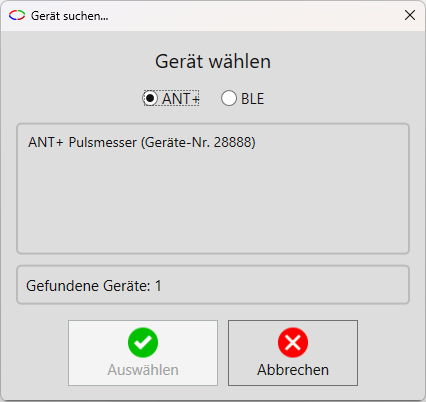
Device selection for ANT+: devices found, with their device number.
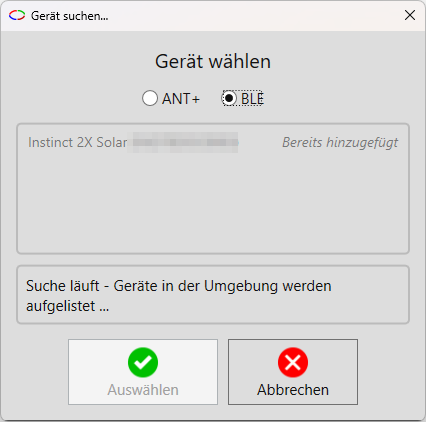
Device selection for BLE: a device that already exists is greyed out and marked “Bereits hinzugefügt” (already added).
Connection test
Training device via Bluetooth, training device via ANT+, heart rate monitor via ANT+, and heart rate monitor via Bluetooth all run through the same test dialog: the status is shown live as text, the button starts as “Cancel” and turns into the green “OK” button on a successful test.
Serial continues to use the familiar connection dialog (“Connecting devices…”) with retry logic - from the devices area only for the training device, while at actual training start also in parallel for an active heart rate monitor (red/green icon per device, “Continue with simulated data” as a fallback).
Requirement for ANT+
The connection tests for ANT+ FE-C and ANT+ HRM need AntInterface.exe. The setup installs it automatically with ErControl (see Installation) - after a normal installation, no further setup is needed. Under Settings → ANT+ / AntInterface → AntInterface (base), the field shows the path actually used and is locked as long as the bundled file is present. If it is missing in an exceptional case (for example an incomplete installation), a different path can be entered there by hand; without a valid path, a corresponding error message appears when testing.